Everyone is talking about blockchain, web3, smart contracts, etc., and you probably want to check out how it works and what you can do with it. In this article, you will learn how to set up your own local Ethereum network on Windows 10/11 to test all the possibilities that the Ethereum blockchain offers without spending any money on Ether.
Install Geth on Windows 11
To install the Ethereum reference implementation Geth (short for Go Ethereum), you first have to download the Windows 64-bit installer from https://geth.ethereum.org/downloads/
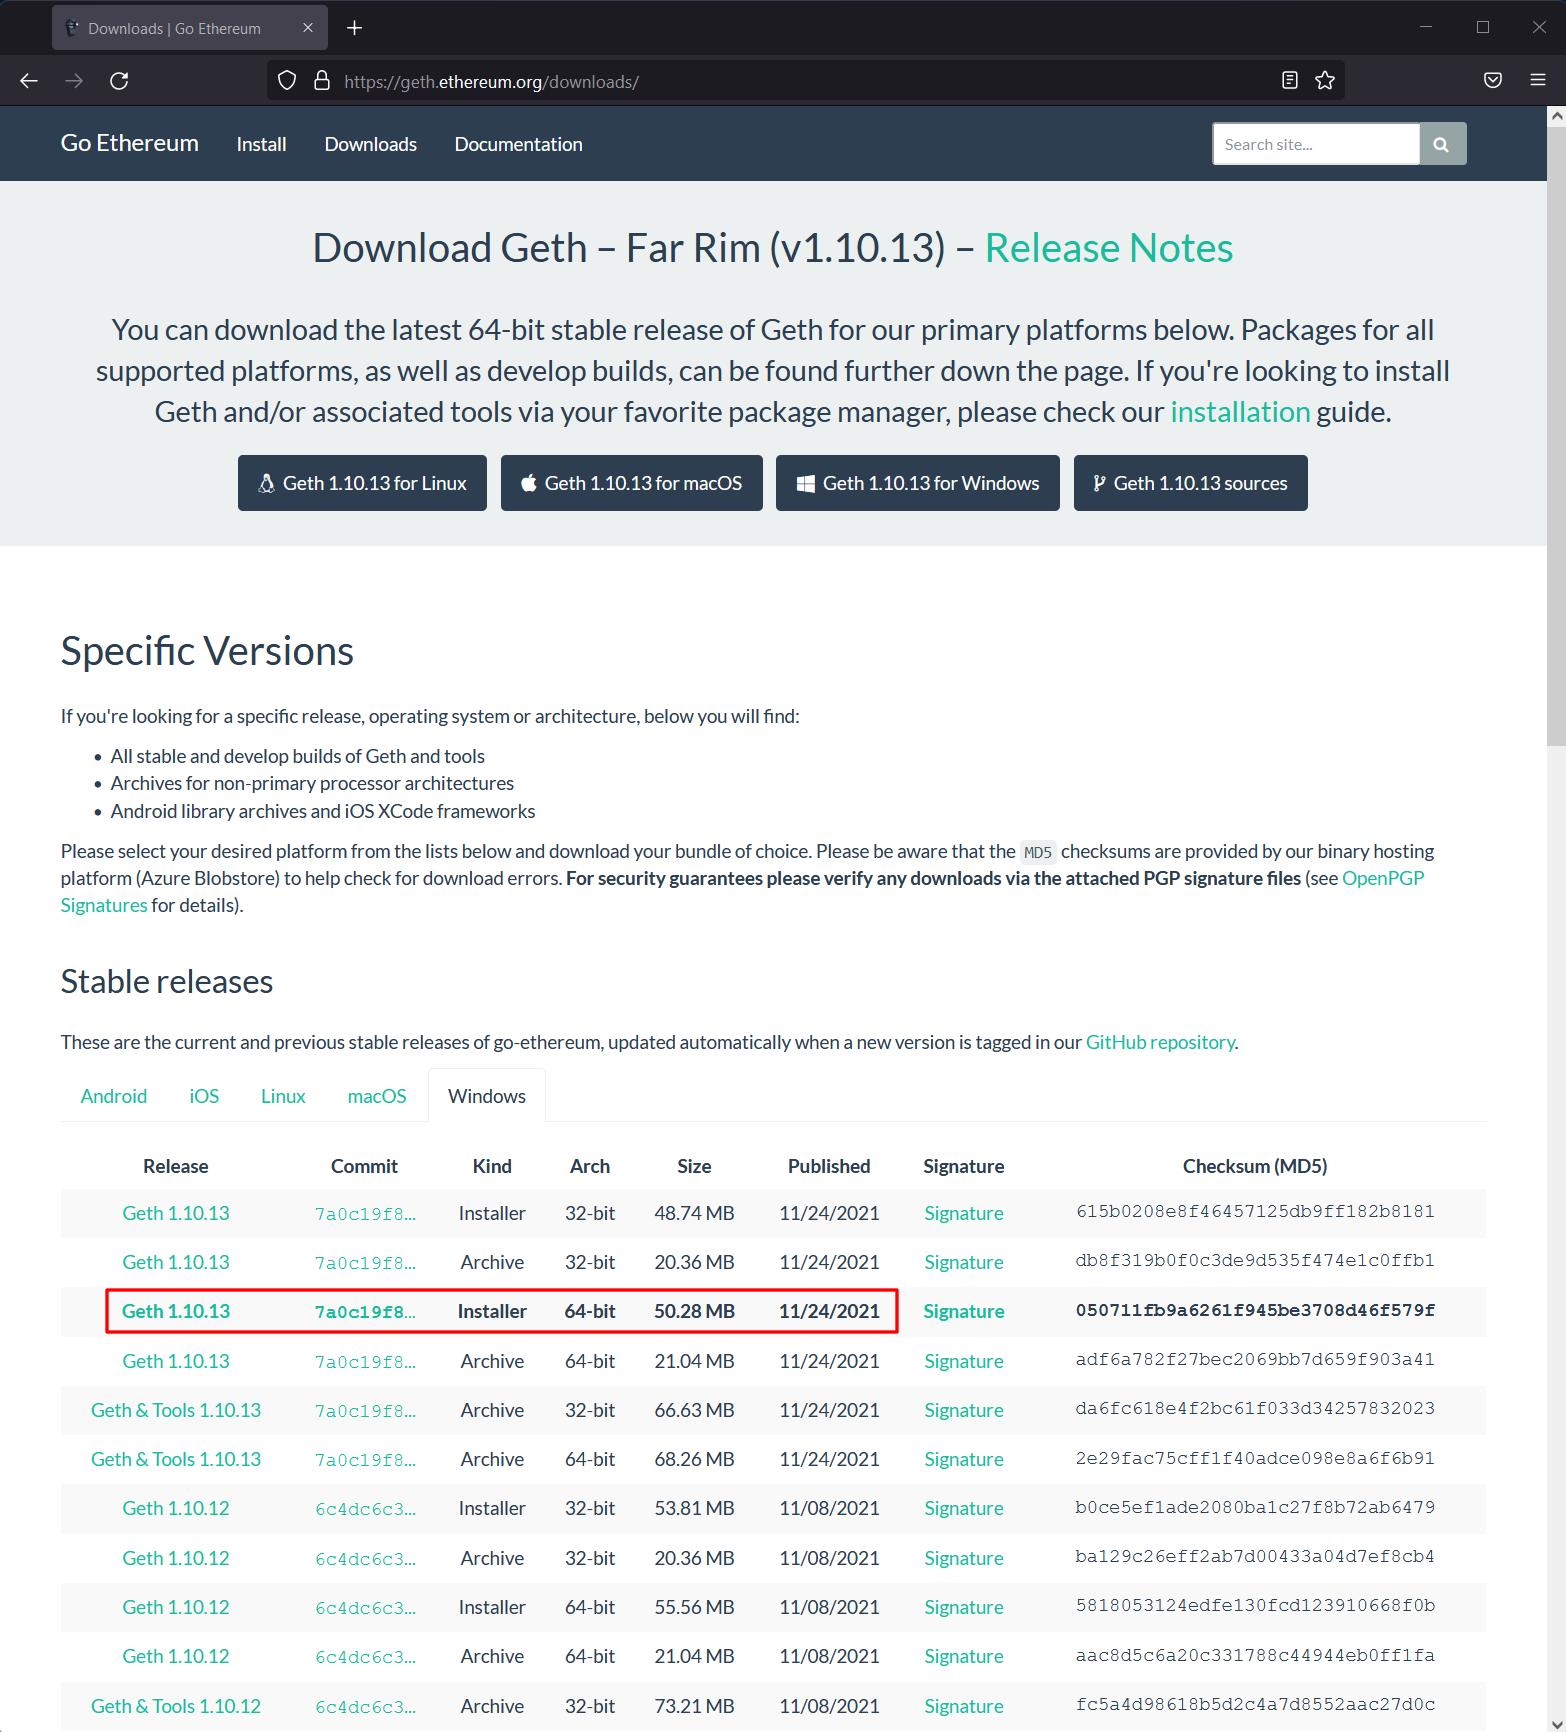
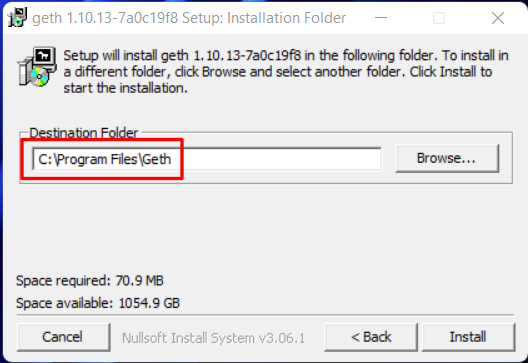
Open your downloads folder and double-click on the installer when the download has finished. Follow the installer instructions and make sure to remember the install directory. The default install directory is C:\Program Files\Geth.
Add Geth to the Path Environment Variable
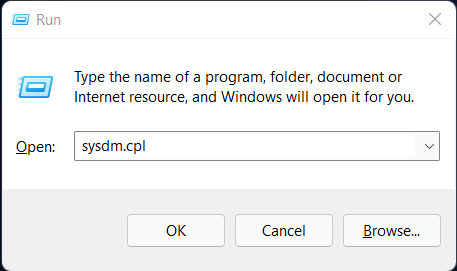
When you finish the installation successfully, you can close the Geth installer. To use the geth command in the Windows Command Prompt/PowerShell, you must add the Geth install folder to the Path environment variable. To edit the Path environment variable, press Win+R to start Run and in the field Open enter: sysdm.cpl and click on OK.
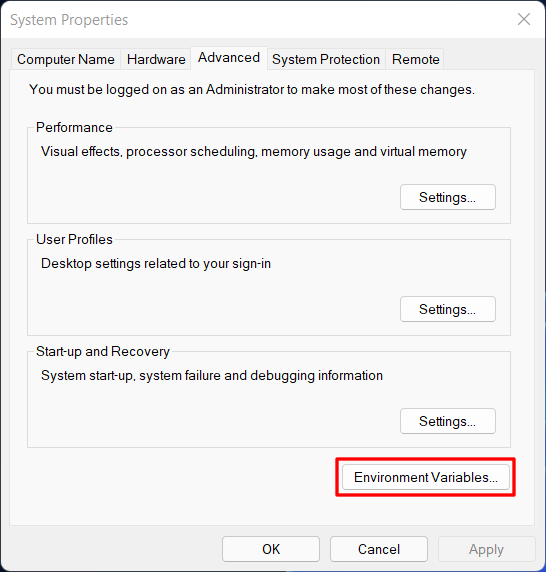
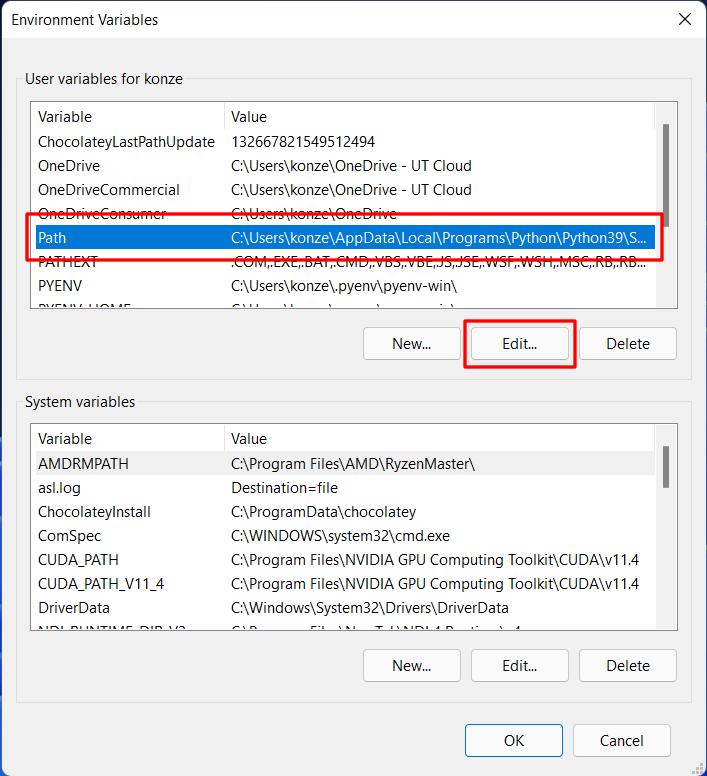
This will open the System Properties dialog. In the System Properties dialog, switch to the tab Advanced and click on Environment Variables … at the bottom:
In the Environment Variables dialog choose the row Path and click on Edit …:
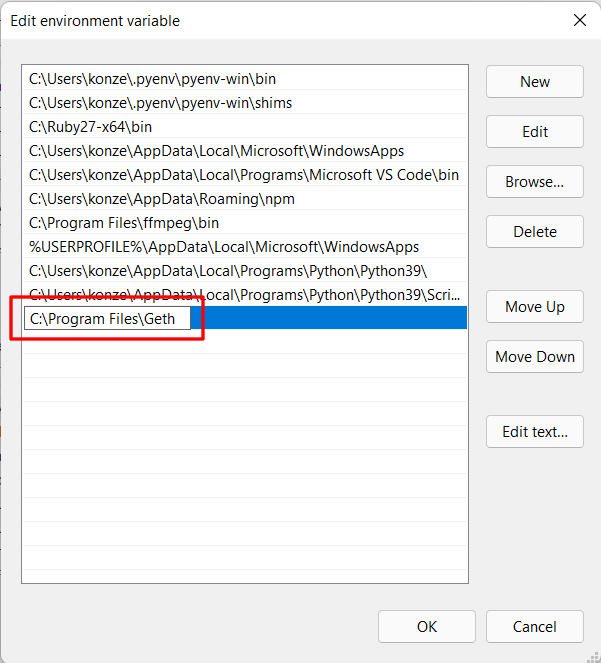
Now you can see all the paths set in the Path variable. Here you have to add the path to the Geth install folder. First, click on New and insert the path you remembered from the installer:
Now you can click on OK in all three dialogs to close them.
Setting up your local Ethereum Network
Open the PowerShell and create a new folder in which you want to store all the files for your local Ethereum network and enter the folder with the PowerShell. For the remainder of this article, this folder is under C:\Users\YOUR_USERNAME\my_ethereum:
1
2
mkdir C:\Users\YOUR_USERNAME\my_ethereum
cd C:\Users\YOUR_USERNAME\my_ethereum
Inside this folder, you have to create a genesis.json file that holds all the necessary settings for the genesis block, the first block of your Ethereum blockchain. The following genesis.json is already setup that allows you to quickly mine your Ether (which is of course, only valid in your local Ethereum network) and applies the latest patches of the Ethereum Yellow Paper:
1
2
3
4
5
6
7
8
9
10
11
12
13
14
15
16
17
18
19
20
{
    "nonce": "0x0000000000000042",
    "mixhash": "0x0000000000000000000000000000000000000000000000000000000000000000",
    "timestamp": "0x0",
    "parentHash": "0x0000000000000000000000000000000000000000000000000000000000000000",
    "extraData": "0x00",
    "gasLimit": "0x8000000",
    "difficulty": "0x400",
    "coinbase": "0x3333333333333333333333333333333333333333",
    "alloc": {},
    "config": {
        "chainId": 2342,
        "homesteadBlock": 0,
        "byzantiumBlock": 0,
        "constantinopleBlock": 0,
        "eip150Block": 0,
        "eip155Block": 0,
        "eip158Block": 0
    }
}
genesis.json fields explained
Here is an explanation for the different fields in the genesis.json (adapted from niksmac on StackExchange):
nonce A 64-bit hash, which proves, combined with the mix-hash, that a sufficient amount of computation has been carried out on this block: the Proof-of-Work (PoW). The combination of nonce and mixhash must satisfy a mathematical condition described in the Yellowpaper, 4.3.4. Block Header Validity, (44), and allows to verify that the Block has really been cryptographically mined and thus, from this aspect, is valid. The nonce is the cryptographically secure mining proof-of-work that proves beyond reasonable doubt that a particular amount of computation has been expended in the determination of this token value. (Yellowpager, 11.5. Mining Proof-of-Work).
mixhash A 256-bit hash which proves, combined with the nonce, that a sufficient amount of computation has been carried out on this block: the Proof-of-Work (PoW). The combination of nonce and mixhash must satisfy a mathematical condition described in the Yellowpaper, 4.3.4. Block Header Validity, (44). It allows to verify that the Block has really been cryptographically mined, thus, from this aspect, is valid.
timestamp A scalar value equal to the reasonable output of Unix time() function at this block inception. This mechanism enforces a homeostasis in terms of the time between blocks. A smaller period between the last two blocks results in an increase in the difficulty level and thus additional computation required to find the next valid block. If the period is too large, the difficulty, and expected time to the next block, is reduced. The timestamp also allows verifying the order of block within the chain (Yellowpaper, 4.3.4. (43)).
parentHash The Keccak 256-bit hash of the entire parent block header (including its nonce and mixhash). Pointer to the parent block, thus effectively building the chain of blocks. In the case of the Genesis block, and only in this case, it’s 0.
extraData An optional free, but max. 32-byte long space to conserve smart things for ethernity.
gasLimit A scalar value equal to the current chain-wide limit of Gas expenditure per block. High in our case to avoid being limited by this threshold during tests. Note: this does not indicate that you should not pay attention to the Gas consumption of our Contracts.
difficulty A scalar value corresponding to the difficulty level applied during the nonce discovering of this block. It defines the mining Target, which can be calculated from the previous block’s difficulty level and the timestamp. The higher the difficulty, the statistically more calculations a Miner must perform to discover a valid block. This value is used to control the Block generation time of a Blockchain, keeping the Block generation frequency within a target range. On the test network, keep this value low to avoid waiting during tests, since the discovery of a valid Block is required to execute a transaction on the Blockchain.
coinbase The 160-bit address to which all rewards (in Ether) collected from the successful mining of this block have been transferred. They are a sum of the mining reward itself and the Contract transaction execution refunds. Often named “beneficiary” in the specifications, sometimes “etherbase” in the online documentation. This can be anything in the Genesis Block since the value is set by the setting of the Miner when a new Block is created.
alloc Allows defining a list of pre-filled wallets. That’s an Ethereum specific functionality to handle the “Ether pre-sale” period. Since your can mine local Ether quickly, you don’t use this option.
chaidId Identifier for your local chain. It should be set to a unique value.
homesteadBlock / byzantiumBlock / constantinopleBlock Is set to 0 to indicate that your local network won’t undergo the switch to Homestead.
eip150Block / eip155Block / eip158Block Are all set to 0 to indicate that your local network won’t be hard-forked for these changes.
After creating the genesis.json you need a folder that stores the blockchain. For that, create another folder inside my_ethereum called chain:
1
mkdir chain
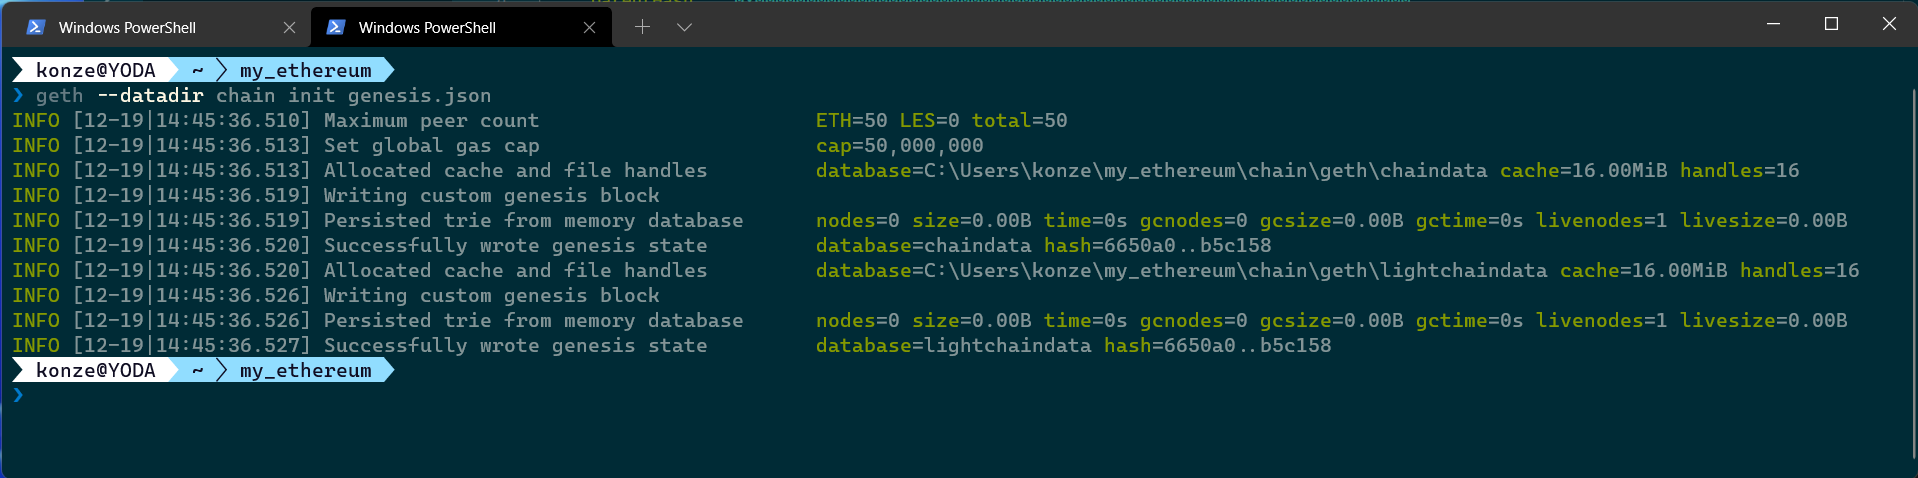
Now you can initialize your local Ethereum network with the following command:
1
geth --datadir chain init genesis.json
Which should give an output comparable to this one:
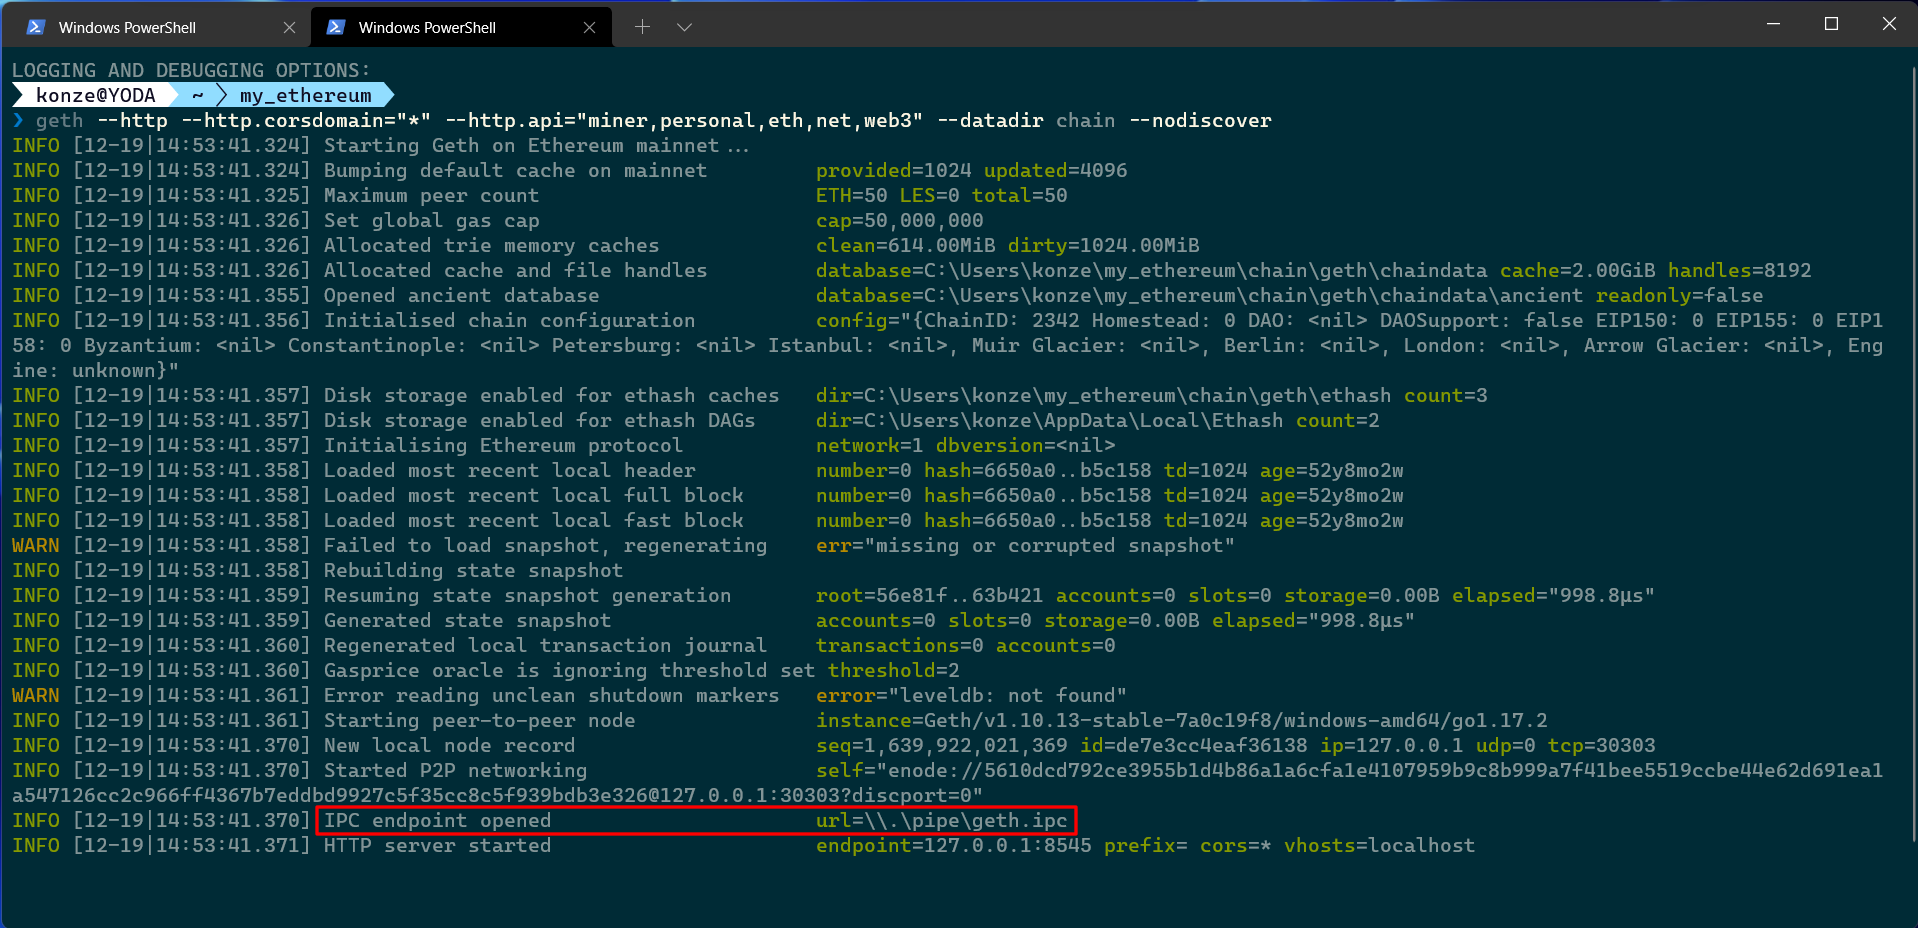
And to start your Ethereum network, execute:
1
geth --http --http.port="8545" --http.corsdomain="*" --http.api="personal,eth,net,web3" --allow-insecure-unlock --datadir chain --nodiscover
This also starts a local webserver on port 8545 and allows connections from different applications indicated by --http.corsdomain="*". Additionally, the webserver allows you to use the APIs personal, eth, net, and web3, which will be accessed by different applications such as MetaMask. --allow-insecure-unlock makes it possible to unlock an account through the command line (necessary for this local test network). With --datadir, you tell geth that the blockchain is stored in the chain folder. And lastly --nodiscover makes sure your local Ethereum network can only be manually added to applications.
Connect to your Local Ethereum Network
Geth launched a local webserver and an interprocess communication API (IPC), which allows you to access it. The URL for the IPC can be found in the log of geth under IPC endpoint opened. You will now use this IPC endpoint to connect to your local Ethereum network. Open a new PowerShell terminal and navigate to your my_ethereum folder and execute the following command:
1
geth attach \\.\pipe\geth.ipc
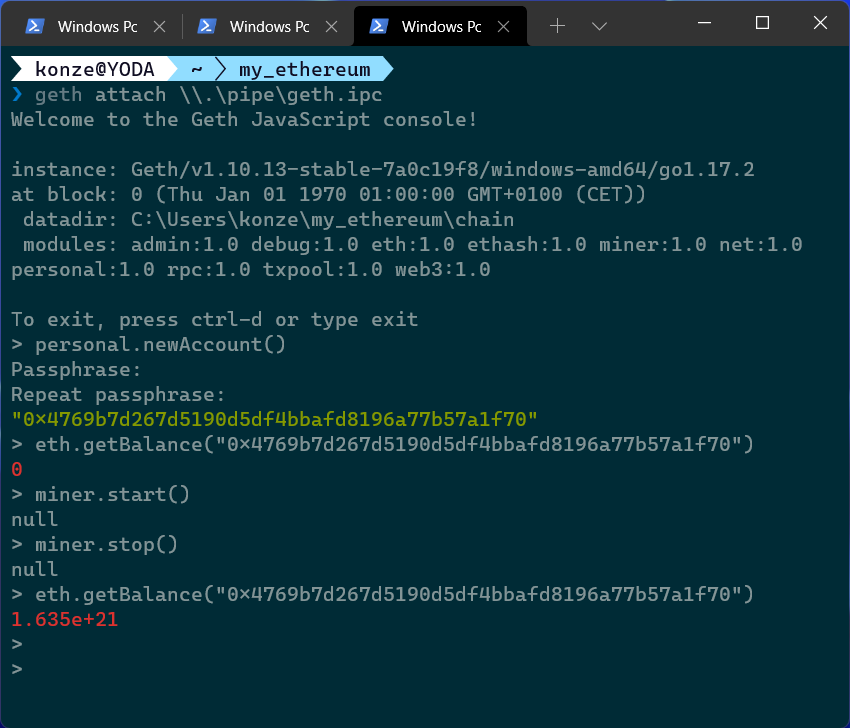
Now you are connected to your local Ethereum network. The first thing you should do is to create an account/wallet with the following command:
1
personal.newAccount()
You have to enter a password two times. Make sure to write down the password; otherwise, you won’t be able to work with this account later on. Afterward, you will be presented with the address of your new account/wallet. Now you can use the address to check how many Ether you got on your account:
1
eth.getBalance("LOCAL_GETH_ADDRESS")
And currently, there is 0 Ether on your account because the network does not have any Ether yet. To get your first Ether on your account you have to mine them. To start a miner on your local Ethereum network, enter:
1
miner.start()
Now have a look in the other terminal where you started the network. Here you can see the mining taking place. After approximately a minute, you can stop the mining process with:
1
miner.stop()
And check your account balance once again with:
1
eth.getBalance("LOCAL_GETH_ADDRESS")
Now you should have some Ether on your account. The number depends on how long you mined Ether with the miner commands:
The balance is a very long number because it is represented in Wei, the smallest possible unit of Ethereum funds. One Ether is \(10^{18}\) Wei. To show your balance in Ether use the following command, which uses a web3 conversion from Wei to Ether:
1
web3.fromWei(eth.getBalance("LOCAL_GETH_ADDRESS"), "ether")
Such that you don’t have to type your account address all the time, you can access the string containing the address with (where 0 is the first account you created):
1
web3.personal.listAccounts[0]
Connect MetaMask to your Local Ethereum Network
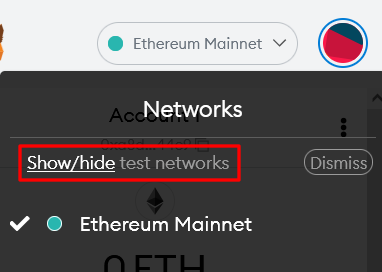
To connect your MetaMask add-on to your local Ethereum network click on the dropdown menu left of your wallet picture:

And click on Show/hide test networks:
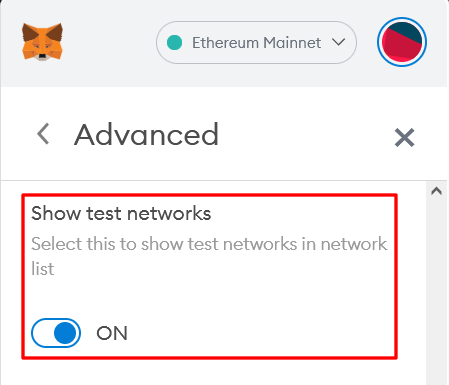
This will open the settings where you can enable that MetaMask should show test networks:
Now you should see a bunch of test networks in the dropdown menu:
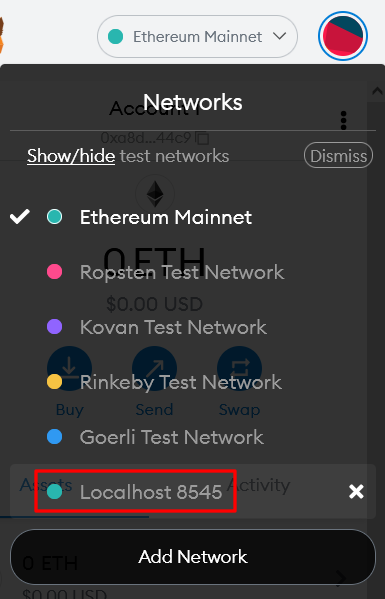
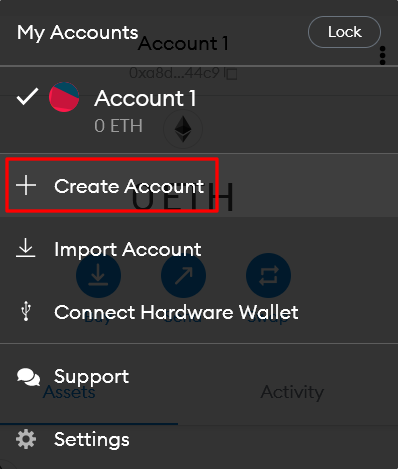
Select the network Localhost 8545, which is your local Ethereum network. You need to create an account in your local Ethereum network through MetaMask. Click on your account picture, and select Create Account. And to distinguish it from your real Ethereum account give it the name Local Account:
Now MetaMask created a new account on your local Ethereum network.
Transfer Funds in Geth
To do something useful with this account you need some Ether. Luckily you already mined a bunch of Ether on the account your created through Geth, which you can now transfer to the account in MetaMask. Before you can transfer funds, you need to unlock the account you created through Geth. For that, enter the following:
1
personal.unlockAccount("LOCAL_GETH_ADDRESS", undefined, 6000)
Instead of undefined you can enter your password. However, this is not good practice as the password is then stored in plain text in the Geth console log. The number 6000 specifies that the account should be unlocked for 6000 seconds.
To send 1 Ether to your MetaMask account enter the following command in the Geth console, and make sure to copy the address from MetaMask and paste it as a string with quotes " after to::
1
2
3
4
5
6
7
eth.sendTransaction(
	{
		from: "LOCAL_GETH_ADDRESS",
		to: "LOCAL_METAMASK_ADDRESS",
		value: web3.toWei(1, "ether")
	}
)
The return value of this command is the transaction hash TX_HASH. You can have a look at this transaction by with:
1
eth.getTransaction("TX_HASH")
Which will return a JSON containing all properties of the transaction.

If you look at your MetaMask account you won’t find any Ether yet, because the transaction has not been processed yet. After all, no miner is running. You can also see in the JSON that there is no blockHash and no blockNumber. To fix that, start the miner again and stop it after a couple of seconds:
1
2
miner.start()
miner.stop()
When you now look at the transaction with eth.getTransaction("TX_HASH") you will see that the transaction has a blockHash and a blockNumber now:

And when you check the balance in your MetaMask account you can see that you now got one Ether:
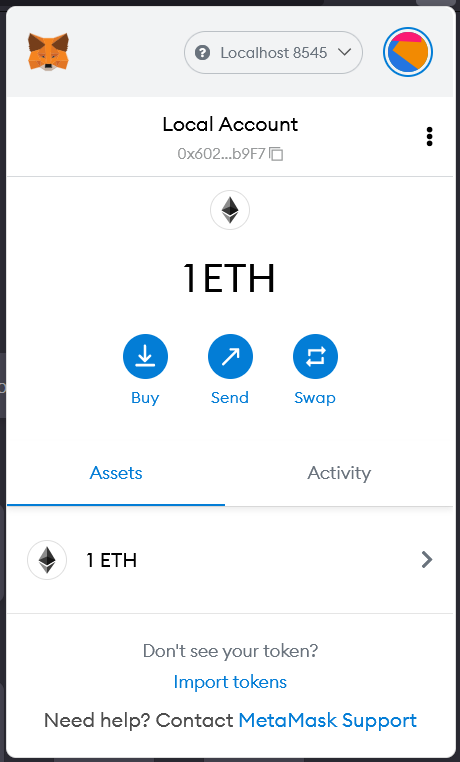
With Ether in your MetaMask account you are done with setting up your local Ethereum network and connecting it to MetaMask. Now you can start testing your Solidity smart contracts and build your web3 application. If you have any questions about this article, feel free to join our Discord community to ask them over there.