Why should you use pyenv and Virtual Python Environments?
As a programmer, either employed at a company, freelancer or even as a hobbyist, you usually work on multiple programming projects simultaneously. And most of those projects require different Python versions and depend on other modules like a particular version of numpy, for example. Or, if you created a Python module yourself and want to validate that it runs correctly on different Python versions, you need a way to install several Python versions on your system. And sometimes, you want to take a sneak at the latest Python release candidate but don’t want to ruin your production system.
For all those situations, pyenv and virtual environments (venv) offer an easy solution for installing different Python versions on your system and setting up environments with other requirements.
In this article and the accompanying Youtube videos, you learn how to install and set up pyenv and venv under Windows 10, macOS, and Ubuntu Linux and how to use it with VSCode.
Installing pyenv
Windows 10/11
pyenv actually started as a tool for Unix platforms such as Linux and macOS; however, there is an excellent Windows 10/11 port of it which can be found in this GitHub repository: https://github.com/pyenv-win/pyenv-win
Installing pyenv-win is not very straightforward due to how Windows 10/11 and PowerShell works, but if you follow those steps, it shouldn’t be too much of a hassle:
- Download
pyenv-winZIP-archive: pyenv-win - Create a new folder
.pyenvin your user folder with the name.pyenv. You can do this using the Explorer or the following PowerShell command:1
mkdir $HOME/.pyenv
- Extract the ZIP-archive and copy the
pyenv-winfolder and the.versionfile from thepyenv-win-masterfolder into the newly created.pyenvfolder in your user folder. - Set the environment variables
PYENVandPYENV_HOMEthat point to the installation folder:1 2
[System.Environment]::SetEnvironmentVariable('PYENV',$env:USERPROFILE + "\.pyenv\pyenv-win\","User") [System.Environment]::SetEnvironmentVariable('PYENV_HOME',$env:USERPROFILE + "\.pyenv\pyenv-win\","User")
- Add the
binfolder to thePATHvariable. Such thatpyenvcan be found when using the command line.1
[System.Environment]::SetEnvironmentVariable('path', $env:USERPROFILE + "\.pyenv\pyenv-win\bin;" + $env:USERPROFILE + "\.pyenv\pyenv-win\shims;" + [System.Environment]::GetEnvironmentVariable('path', "User"),"User")
- Close the current PowerShell.
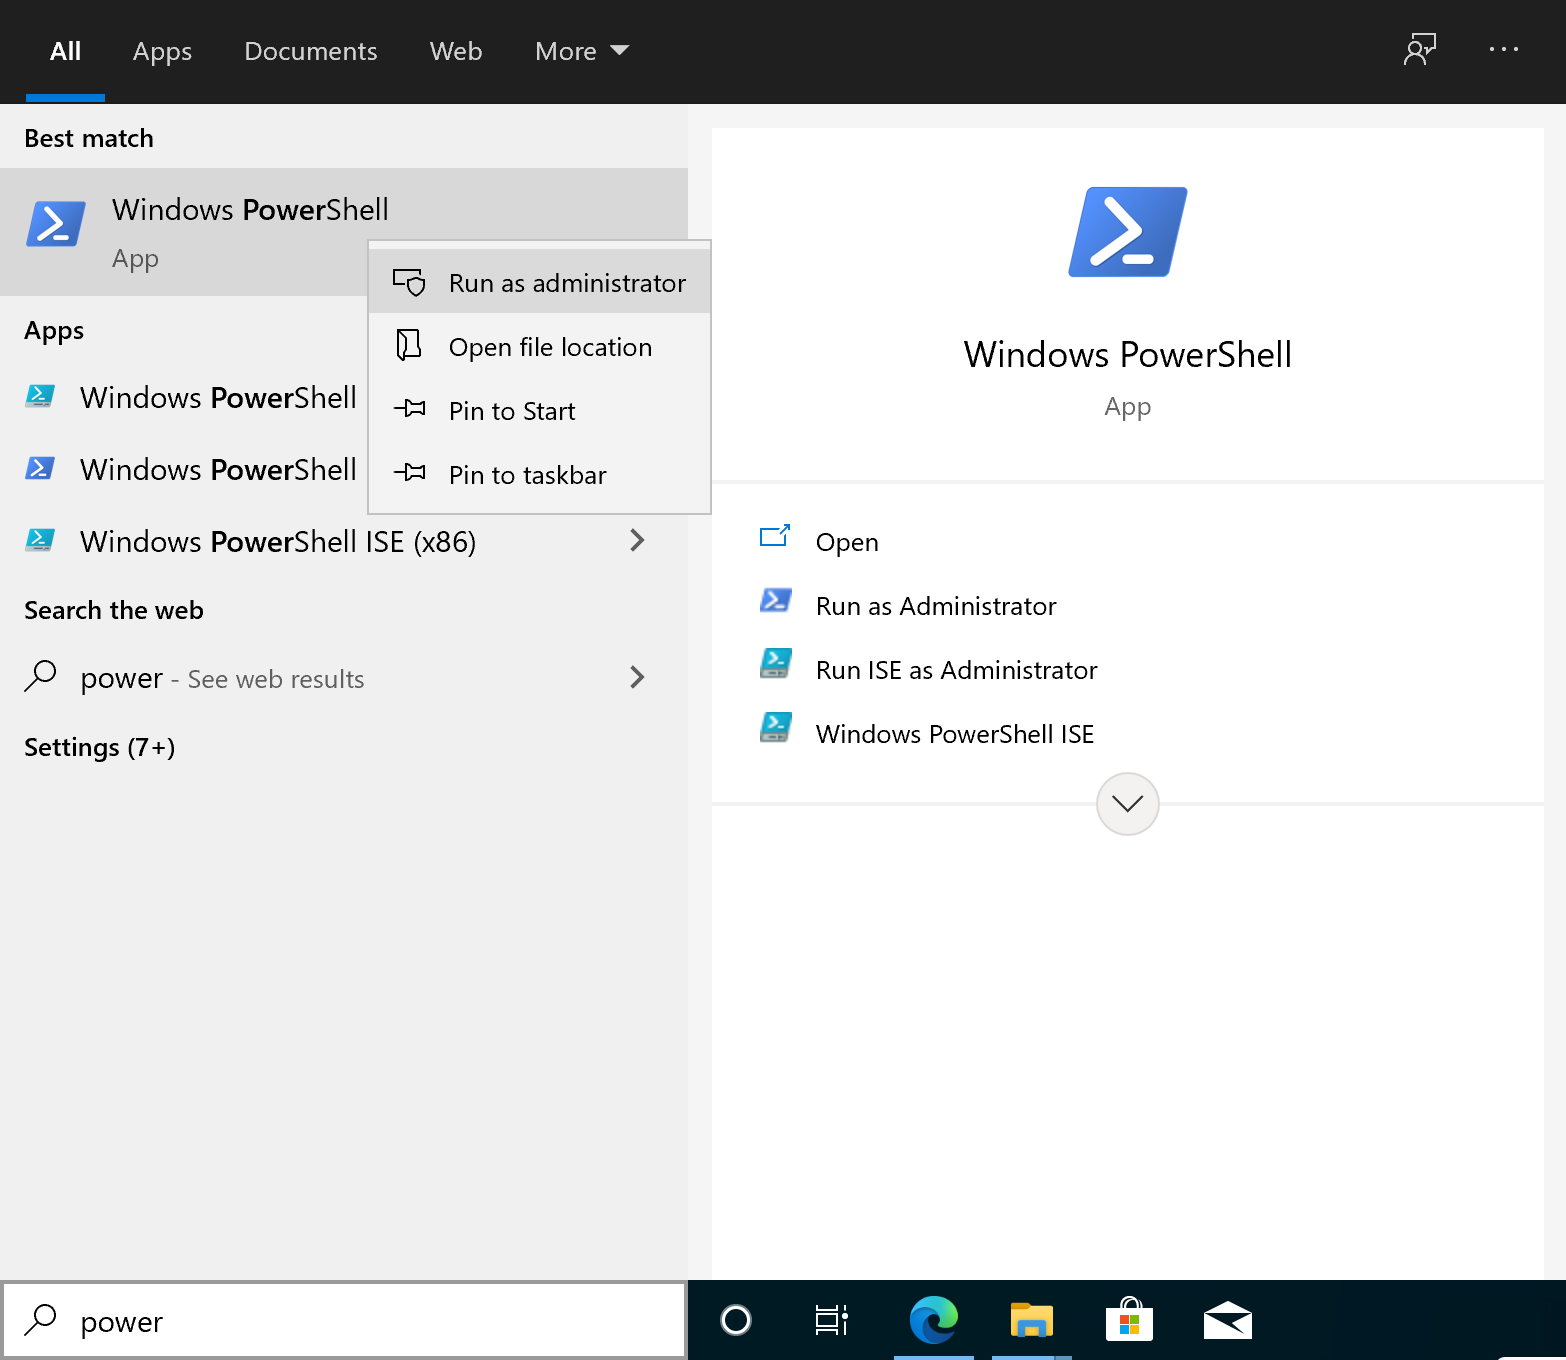
- If you haven’t enabled script execution yet, start a new PowerShell with admin privileges by right-clicking on the PowerShell icon in the start menu and choose Run as administrator. Otherwise, skip ahead to step 9.
![Run PowerShell as administrator]()
- Enter the following command into the PowerShell to enable the execution of scripts:
1
 Set-ExecutionPolicy unrestricted
And press
Ato choose Yes to ALL. Afterward, you can close this PowerShell window and open a new one without admin privileges.![Set PowerShell execution policy]()
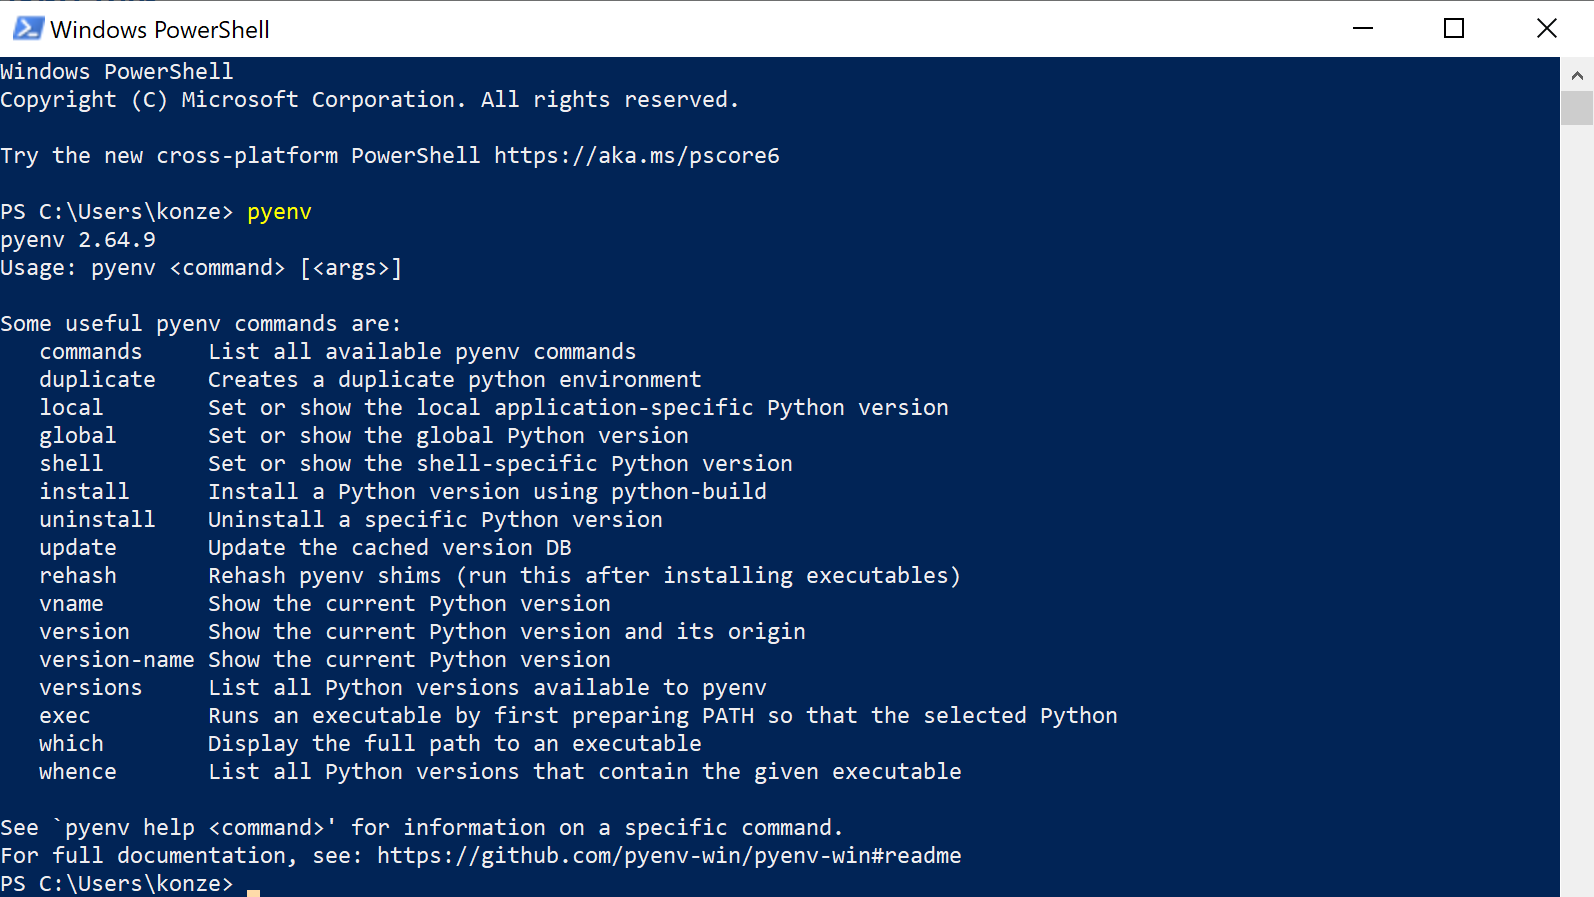
- Now, you can run
pyenvby entering:1
pyenv
![Run pyenv help in the PowerShell]() If you encounter a security warning from where you have to choose if you want to run
If you encounter a security warning from where you have to choose if you want to run pyenvyou can disable this warning by “unblocking” the pyenv script with the following command:1
Unblock-File $HOME/.pyenv/pyenv-win/bin/pyenv.ps1

 If you encounter a security warning from where you have to choose if you want to run
 macOS
Before you can install pyenv on macOS, several other software packages have to be installed before. Firstly you need the XCode command line tools, which are installed via the following command:
1
xcode-select --install
As pyenv builds the Python versions from scratch, some libraries for the build process are required. Those libraries can be installed through the package manager Homebrew:
1
brew install openssl readline sqlite3 xz zlib
Installing pyenv on macOS can be done in two ways. The first one is to use the package manager Homebrew:
1
2
brew update
brew install pyenv
And after the installation has finished successfully, enter the following to add the pyenv to your $PATH and start pyenv when a new terminal window is opened (if you are not using zsh as a shell, you have to change ~/.zshrc accordingly):
1
echo 'eval "$(pyenv init --path)"' >> ~/.zshrc
If you don’t want to install pyenv via Homebrew, you can install it directly from the GitHub repository. Enter the following command into your command line to clone the pyenv GitHub repository into your home directory:
1
git clone https://github.com/pyenv/pyenv.git ~/.pyenv
After cloning it you need to enter the following commands to add pyenv to your $PATH and start it when a new terminal window is opened (if you use a different shell than zsh you have to change ~/.zshrc accordingly):
1
2
3
echo 'export PYENV_ROOT="$HOME/.pyenv"' >> ~/.zshrc
echo 'export PATH="$PYENV_ROOT/bin:$PATH"' >> ~/.zshrc
echo 'eval "$(pyenv init --path)"' >> ~/.zshrc
Linux (Debian/Ubuntu)
To install pyenv on Debian or Ubuntu-based Linux distributions, you have to install several libraries and packages necessary for building Python from scratch. Enter the following command into your terminal to install all necessary packages:
1
2
3
4
sudo apt install -y make build-essential libssl-dev zlib1g-dev \
libbz2-dev libreadline-dev libsqlite3-dev wget curl llvm libncurses5-dev \
libncursesw5-dev xz-utils tk-dev libffi-dev liblzma-dev python3-openssl \
git
To install pyenv you can clone it directly from the GitHub repository:
1
git clone https://github.com/pyenv/pyenv.git ~/.pyenv
After cloning it you need to enter the following commands to add pyenv to your $PATH and start it when a new terminal is opened (if you use a different shell than bash you have to change ~/.bashrc accordingly):
1
2
3
echo 'export PYENV_ROOT="$HOME/.pyenv"' >> ~/.bashrc
echo 'export PATH="$PYENV_ROOT/bin:$PATH"' >> ~/.bashrc
echo 'eval "$(pyenv init --path)"' >> ~/.bashrc
Using pyenv
After you successfully installed pyenv it is time to look at the different commands that pyenv offers to manage different Python versions.
Probably the most important command is:
1
pyenv install [PYTHON_VERSION]
With this command, you can install a specific Python version on your system. To see all versions that are available to install enter:
1
pyenv install -l
This will print out a very long list on your terminal (depending on your operating system) of Python versions you can install. And it is not just the standard CPython versions. There is also pypy, which is an implementation of Python in Python itself. Or anaconda, which is very popular in the sciences and data mining. Pick your preferred Python version and use pyenv install to install it on your system.
To see which versions you already installed on, enter the following command into your terminal:
1
pyenv versions
This command will list all the Python versions that you can choose from pyenv. The version that is currently active has an asterisk (*) in front of it:
1
2
3
4
  system
  3.10.0rc1
* 3.9.6 (set by /home/konze/Programming/ml_acc_timing_model_extraction/.python-version)
  pypy3.7-7.3.5
If you want to know which Python version is currently active in your shell, just type:
1
pyenv version
Now, after you installed several different versions, how do you set a specific version? To select a default Python version that is active when you open a new terminal, you use the global command:
1
pyenv global [PYTHON_VERSION]
Ensure to enter the exact name of the installed Python version shown when you enter pyenv versions. Alternatively to pyenv global [PYTHON_VERSION], you can also set an environment variable (Unix only) PYENV_VERSION with:
1
export PYENV_VERSION=[PYENV_VERSION]
If you want to set a specific Python version for your current terminal session, use:
1
pyenv shell [PYTHON_VERSION]
This will set the Python version only as long as your session is active. So after you close your terminal, everything is back to default.
To set a project Python version that is active as soon as you “cd” into the project directory, enter the following when you are inside of the project’s root directory:
1
pyenv local [PYTHON_VERSION]
This will create the file .python-version that contains the [PYTHON_VERSION]. You can even check that by entering pyenv versions, and it will tell you based on what setting the currently active Python version was selected.
Of course, there are more pyenv commands, but I won’t go into those in this article. You can find a complete command reference over here: pyenv Command Reference.
Creating Virtual Environments
The real power of Python comes from its vast amount of modules ranging from graph theory to machine learning. To install those modules, the pip command is used. If you are using pyenv and you enter pip:
1
which pip
and for Windows PowerShell:
1
get-command pip
It will show you that pip is called from the .pyenv directory. And if you install a module using pip it is installed into your .pyenv directory tied to the currently active version. So if you install numpy while your current Python version is 3.9.6 numpy won’t be available when you switch to anaconda3-2021.05. However, this granularity might not be enough, and you need a project-based distinction between different modules. And virtual environments do exactly that for you.
To create a new virtual environment for your project, open a terminal in your project’s root directory. Make sure you set your desired Python version for this project using pyenv local [PYTHON_VERSION] then enter:
1
python -m venv .venv
This command will create a new directory .venv which includes the Python interpreter (provided by pyenv) and all the modules installed using pip later on. After creating the newly created virtual environment, you have to activate it. This is done by entering:
1
source .venv/bin/activate
and for Windows PowerShell:
1
".\\.venv\\Scripts\\activate"
Now a (.venv) string will appear in front of your command line. After you activate the virtual environment, you can check with which python or get-command python that is now called from the .venv directory. And when you use pip, it also installs all modules into the .venv directory. In the rare case you messed up your virtual environment, you can delete the .venv directory and create a new one with python -m venv .venv.
Using Virtual Environments with VSCode
Now that you successfully installed pyenv and set up virtual environments, I will show you in this section how to tell VSCode to activate virtual environments by default for your Python projects.
When you open your Python project directory with VSCode and create a virtual environment, it won’t activate it by default. To do this, you have to open the workspace settings.json with Ctrl+Shift+P or Cmd+Shift+P on macOS and enter settings.json.

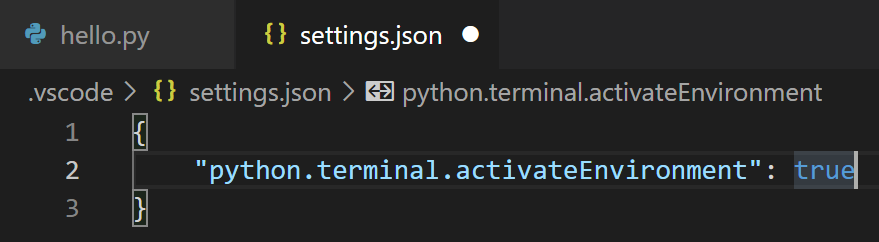
This will create a new file .vscode/settings.json in your project’s root directory. When you now run your Python application, it will automatically activate your virtual environment. In the newly created settings.json enter the new value
1
"python.terminal.activateEnvironment": true
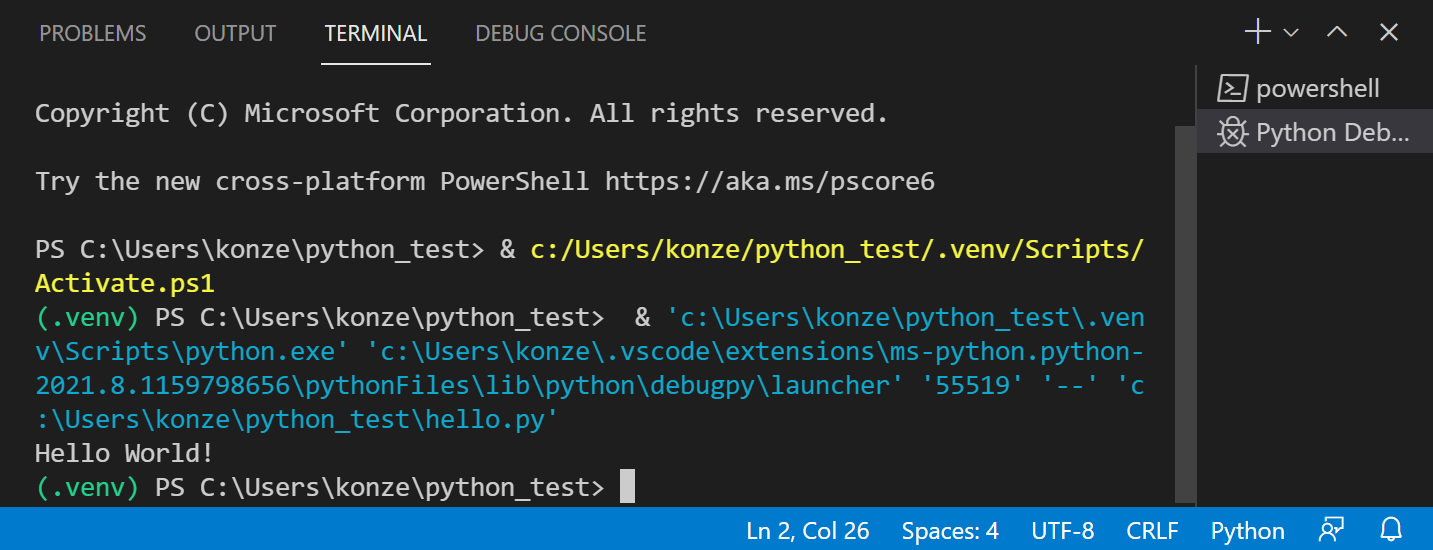
And when you now run your Python program in VSCode it will automatically activate your virtual environment.
Conclusion
I hope this article on how to set up pyenv and virtual Python environments and the related Youtube videos were helpful for you. If you got any questions regarding the setup process, leave me a comment under my Youtube videos or join our lovely Discord community.